 Fernbrook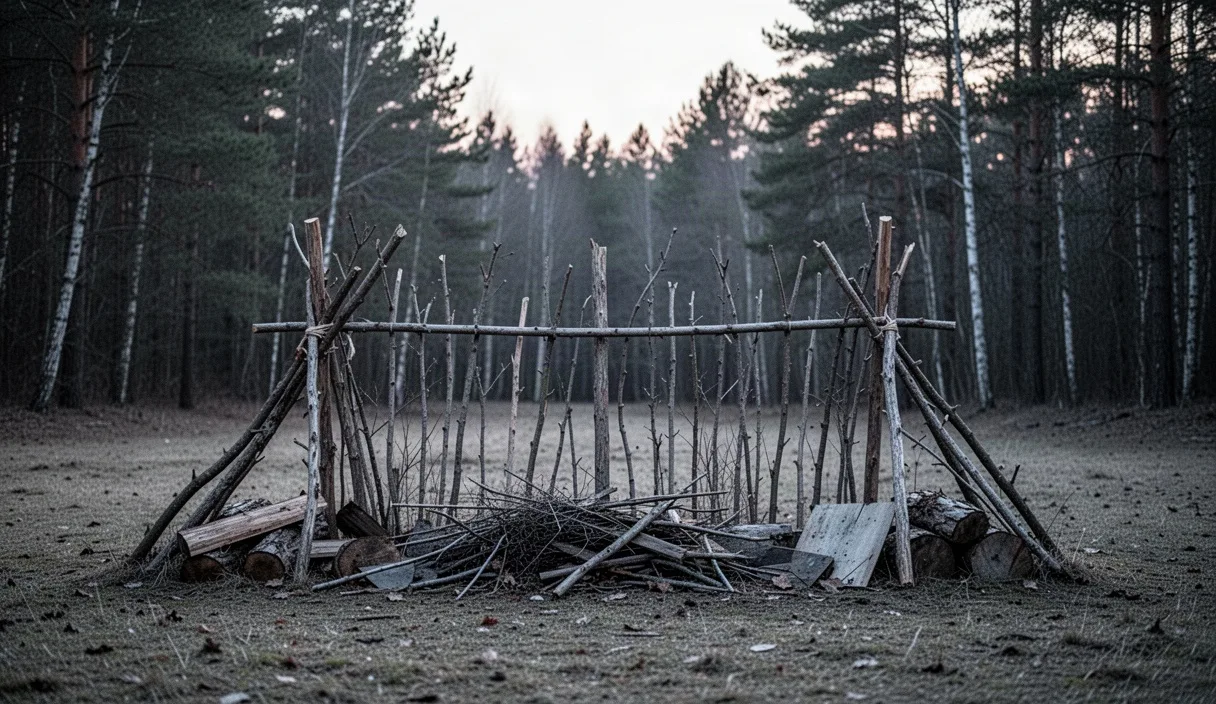

Most windbreaks built at camp fail for one of two reasons: they go up facing the wrong direction, or they're made from branches too flimsy to do anything but rattle in the first real gust. A windbreak is not a decorative lean-to. It is a working structure meant to redirect airflow away from a sleeping area or fire, and like any structure it depends on reading the site correctly before a single branch is cut or dragged into place.
Deadfall, the fallen and dead wood already lying on the forest floor, is usually the fastest material to work with because it requires no cutting tools and no standing timber is disturbed. The trade-off is that deadfall varies enormously in strength, moisture content, and shape, so selecting it well matters more than it does with fresh-cut poles. What follows is a practical sequence: read the wind, sort the wood, build the angle, reinforce it, and place it correctly relative to fire and sleep. The last section covers when skipping the whole exercise is the smarter call.
Assessing Wind Direction Before You Build
Wind at ground level in wooded or hilly terrain rarely matches the general forecast. Cold air drains downhill after dusk, valleys funnel gusts along their length regardless of the prevailing weather system, and tree cover can redirect airflow by forty degrees or more within a few dozen meters. Rather than guessing, watch smoke from a small test fire, drop a handful of dry leaves or grass and note which way they drift, or tie a light strip of cloth to a stick and hold it up at chest height in the open.
Do this at two different times if the schedule allows: once on arrival in daylight, and again close to the hour you expect to sleep. Wind direction commonly shifts as temperatures drop in the evening, especially near water or on slopes, so a break built against a 4 p.m. breeze can be nearly useless by 10 p.m.
Pay attention to gust behavior, not just steady direction. A site with a consistent light wind from one bearing is easier to block than one with swirling gusts caused by nearby rock faces or dense stands of trees, where a single flat windbreak may only redirect the problem rather than solve it. In swirling conditions, a broader, gently curved structure works better than a straight wall.
Selecting Deadfall Branches by Size and Sturdiness
Not all deadfall is equal, and sorting it by hand before building saves time later. Wood that snaps cleanly with a sharp crack when bent is dry and reasonably sound; wood that bends without breaking or crumbles at the touch is punky and will not hold weight or resist wind loading.
A useful rough sizing guide for a single-person or two-person windbreak:
- Main uprights or leaning poles: 6 to 10 cm diameter, at least 1.5 meters long, sound wood only, no visible rot at the base.
- Cross members and weave branches: 2 to 4 cm diameter, flexible enough to bend slightly without cracking, used to fill gaps between the main poles.
- Fine brush and twigs: under 2 cm, packed into remaining gaps and useful for the debris layer covered later.
Test every main pole by pressing one end against the ground and leaning your body weight onto it at an angle. If it flexes more than a few centimeters or you hear cracking fibers rather than a clean snap-resistance, discard it for structural use and set it aside for the debris layer instead. This single test, done branch by branch, is the difference between a windbreak that survives a night of gusts and one that needs rebuilding at 2 a.m.
Basic Lean Structure and Angle Choices
The simplest functional windbreak is a lean structure: main poles angled from the ground up to a horizontal ridge pole or a low branch, forming a sloped face that the wind hits and is deflected upward and over rather than straight through.
The angle matters more than most people assume. A face angled at roughly 45 to 60 degrees from the ground sheds wind efficiently while still blocking a reasonable amount of radiant heat if placed near a fire. A steeper angle, closer to vertical, blocks more wind directly but reflects less heat back down toward the ground, which matters if the break doubles as a heat reflector. A shallower angle, below 30 degrees, sheds wind well but takes up more ground space and uses more material to achieve the same height of coverage.
| Angle from ground | Wind deflection | Heat reflection (if near fire) | Material needed |
|---|---|---|---|
| 30 degrees or less | Good | Poor | High |
| 45 to 60 degrees | Good to very good | Moderate to good | Moderate |
| 70 degrees or more | Moderate | Good | Low |
For most single-night camps, a 45 to 55 degree angle is the practical middle ground: it uses a manageable amount of deadfall, sheds wind reasonably well, and still throws some fire heat back into the sleeping area if positioned correctly. Anchor the base of each pole against a rock, a shallow trench, or driven into soft ground by at least 10 to 15 cm to stop the whole structure sliding forward under load.
Reinforcing with Debris and Ground Cover
A bare frame of poles does very little against wind on its own; the gaps between poles let air through almost unimpeded. The frame is only the skeleton. Filling it is what actually stops airflow.
Work from the bottom up, weaving the smaller flexible branches horizontally between the main uprights the way a basket is woven, then packing the remaining gaps with fine brush, bark slabs, and dry bracken or leaf litter pressed in by hand. A layer of packed leaves or moss roughly 8 to 10 cm thick across the face will noticeably cut wind penetration compared with a bare woven frame.
Ground cover matters as much as the vertical face. Wind that slips underneath the base of a windbreak undoes most of the benefit of the structure above it, so bank loose soil, snow if present, or a low ridge of packed debris along the base to seal that gap. In wet conditions, a base of stacked bark or flat stones keeps the lower debris layer from wicking moisture up into anything stored or slept nearby.
Check the fill after the first hour of wind exposure. Loose debris settles and shifts, opening small gaps near the top and sides that were not obvious when first packed. A five-minute check and patch before dark is worth more than an elaborate initial build.
Placement Relative to Fire and Sleeping Area
Where the windbreak sits relative to fire and sleeping space determines whether it helps or actively creates a hazard. The core rule: the windbreak should sit on the windward side of both the fire and the sleeping area, positioned close enough to block direct gusts but never so close to the fire that reflected heat or drifting sparks can reach dry brush in the structure itself.
A workable minimum distance between a windbreak and an open fire is around 1.5 to 2 meters, adjusted upward if the break contains a heavy debris fill of dry material, since that fill is itself fuel. Sparks carried on gusty wind travel further than most people expect, and a windbreak built from dry brush is, structurally speaking, kindling with a job to do. Treat it accordingly.
The sleeping area should sit on the sheltered side of the windbreak, ideally with the fire positioned between the break and the sleeping space so the structure both blocks wind and reflects some fire heat inward. This arrangement, wind break, then fire, then sleeping area, is the standard configuration used in most three-sided camp layouts because it lets one structure serve two functions at once.
Avoid placing a windbreak directly beneath dead standing branches or a leaning dead tree, sometimes called a widowmaker, since the added structure underneath does nothing to reduce the risk of a branch coming down in exactly the wind conditions the break was built to handle.
When a Windbreak Isn't Worth the Time
Building a proper windbreak from deadfall, done carefully with sorting, angle work, and debris fill, can take 45 minutes to over an hour for one person. That is a significant chunk of daylight or energy, and it is not always the right call.
For a single overnight stop where the forecast shows light and steady wind under roughly 15 km/h, natural terrain features, a rock outcrop, a dense hedge line, a fallen log already at a useful angle, will often do nearly as much work as a built structure for a fraction of the effort. Scouting for these features before defaulting to construction is worth the five minutes it takes.
Deadfall selection also becomes a poor trade in areas where dead wood is scarce, such as heavily used campsites that have already been picked over, or ecologically sensitive ground where removing deadfall affects local decomposition and small-animal habitat. In both cases, a smaller personal shelter adjustment, angling a tent or bivvy differently, or using a tarp pitched low and tight, achieves similar protection without the material cost.
If wind speeds are forecast above roughly 40 km/h with gusts higher, no deadfall windbreak built by hand should be relied on as primary protection; at that point the priority shifts to finding natural shelter, lowering your profile, or relocating the camp entirely. Anyone facing sustained severe wind conditions in an unfamiliar area should treat this as a safety decision rather than a campcraft one, and err toward retreat or a more substantial shelter rather than trusting an improvised structure.
Common mistakes
- Building the break facing the daytime wind and ignoring the evening shift in direction.
- Using flexible, punky deadfall for main uprights because it was closest to hand.
- Leaving gaps at the base where wind slips underneath the entire structure.
- Placing dry brush fill too close to an open fire, creating an avoidable spark hazard.
- Spending an hour building a full structure when a nearby rock or log would have done most of the job.
Next steps at camp
On arrival, spend the first ten minutes reading wind behavior before touching any wood: watch smoke, drop leaves, note the bearing, and check again closer to nightfall. Sort available deadfall into main poles, weave branches, and fine brush before starting to build, discarding anything that fails the bend test. Build the angled face at 45 to 55 degrees for most conditions, seal the base against ground-level drafts, and place the finished structure so it sits between the wind and the fire, with the fire between the break and the sleeping area. Recheck the fill after an hour of exposure, and if wind speeds exceed what the structure can reasonably handle, treat relocation or natural shelter as the safer option rather than reinforcing further.